What exactly is the winter solstice?
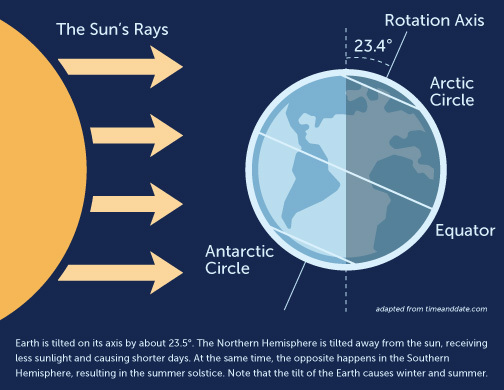
It marks the time when one of the Earth’s poles has its maximum tilt away from the sun. The result is the day with the least period of daylight, creating the so-called “shortest day of the year.” It takes place in the Northern Hemisphere between December 20 and 23.
The winter solstice offers a great opportunity for your students to learn about the seasons and weather. Incorporate the following activities for grades K-5 to reinforce your science lesson.
5 Winter Solstice Activities
1.Learn How the Earth Moves
Create a bulletin board that shows Earth and the sun. Make sure the equator is clearly marked. Each day, change the Earth’s position.
Help your students understand that the amount of sunlight an area receives is determined by the relative position of Earth and the sun. Ask your students to identify the season in parts of the world. Why is it different in each hemisphere? Why does it matter how close locations are to the equator?
Provided by Education World
2.Seasonal Hot Potato
Select one student to be the sun. Have the student acting as the sun stand in the center of students organized in a slightly oval shape, to mimic Earth’s elliptical path. The student representing the sun will need to hold a flashlight that follows the globe.
Hand the globe to one student randomly. When you start the music, students will pass the globe so that it moves in a counter-clockwise motion. Have students hold the globe so that the North Pole points in the same direction. You may want to have one wall in the room replicate Polaris, the North Star.
Pause the music when the globe shows each of the four seasons. Ask students about the season represented, along with other follow-up questions that can reinforce their understanding of how weather is influenced by positioning of Earth and the sun.
Provided by Teq
3.Bullseye-based Activity
A bullseye and a flashlight can help illustrate how sunlight is distributed on Earth. Start with a bullseye, or you can draw a circle on a blank sheet of paper. In either case, draw a line through the middle to indicate the equator. Next, prop a flashlight or desk lamp in some fashion that keeps the light source steady.
Optionally, use the bullseye or paper to pin your approximate location on Earth. If you do this, you can introduce latitude to the class.
Use a protractor to make sure the target is at a perfect 90-degree angle to the floor. Then, turn on the light and aim it directly at the equator. Discuss the intensity of the light on the various parts of the bullseye or paper. Then, angle the sheet. If you want to be exact, you can use a protractor to measure a 23.5-degree angle away from the light. How does that action affect light on different parts of the bullseye or paper?
Provided by STEAM Powered Family
4.Study the Weather
Have students use a website like CNN Weather to study national and regional weather. Ask them to look at winter weather in different locations across the United States. Then, ask students follow-up questions:
- Which states are farthest from the equator?
- Which states are closest to the equator?
- Which states have the warmest temperatures today?
- Which states have the coldest temperatures today?
- Why are winter temperatures in Florida warmer than winter temperatures in Michigan?
Provided by Education World
5.Build Your Own Stonehenge
If you have the outdoor space, such as an unused sports field, you can build a real-life replica of Stonehenge. If not, there are alternatives below that enable your students to track the path of the sun.
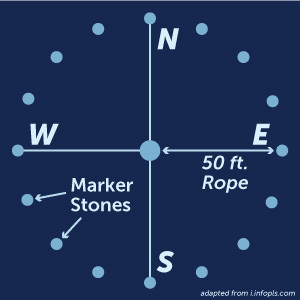
To build your own Stonehenge, you’ll need a center stake, 50 feet of rope, 20 to 30 stones or small stakes, and a compass. Place a reference stake at the center and then place a compass on top of it. Next, determine due north and use a rope to place a marker 50 feet north of the center; repeat for east, west and south. Now, you’re ready to mark the point of sunsets with a stone or stake. Repeat the process every seven days or so.
There are alternatives to constructing your own Stonehenge. You could tape a picture of the western skyline to a western-facing window, and then draw an arrow on the photo corresponding to the point of sunset, noting the date. Another idea is to make small marks on a western-facing window. Simply have one person stand at the same point in the room, and have the other make the mark, noting the date.
Creating an astronomical calendar allows students to see how the rising and setting of the sun changes each day, thanks to having a fixed reference point. An interactive calendar can help when discussing different seasons and the weather.